linux 搭建 nginx正向代理
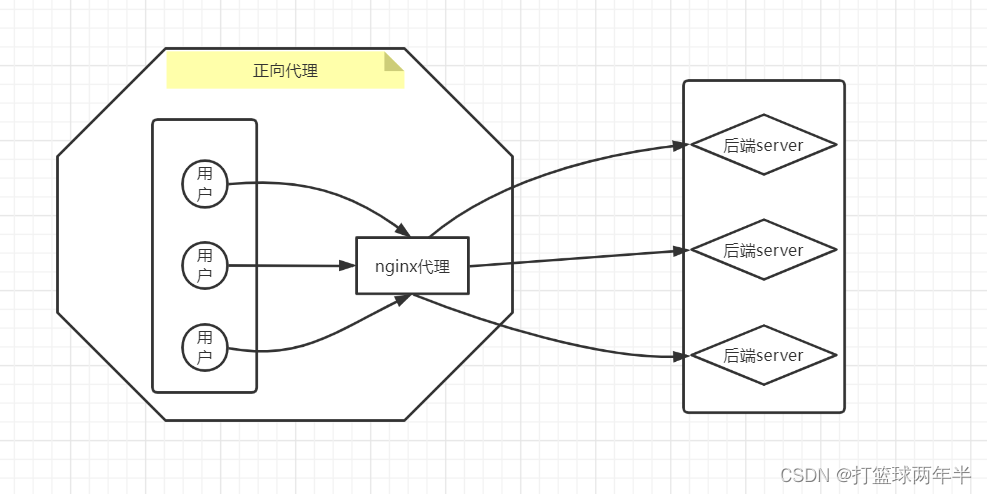
一、正向代理俗称VPN,图示如下:

二、实验机器

三、安装nginx 环境
Ng本身只支持http的正向代理
需要补丁ngx_http_proxy_connect_module模块来支持http、https的正向代理
3.1安装依赖
yum -y install pcre-devel zlib-devel gcc gcc+c++ make openssl-devel pcre-devel zlib-devel patch1
3.2 下载正向代理模块(这个模块可能不适合其他版本nginx)
mkdir -p /nginx-proxycd /nginx-proxywget https://github.com/chobits/ngx_http_proxy_connect_module/archive/refs/heads/master.zipunzip ngx_http_proxy_connect_module-master.zip1234
如果下载失败可用百度云:
链接:https://pan.baidu.com/s/1tN1qsdsvXqIDX3jYkzWriA
提取码:q885
3.3安装nginx,并安装正向代理模块
下载解压nginx
cd /nginx-proxywget https://nginx.org/download/nginx-1.20.1.tar.gztar --no-same-owner -zxvf nginx-1.20.1.tar.gz123
PS:一定要先进入nginx 解压目录,再执行patch命令
cd /nginx-proxy/nginx-1.20.1
patch -p1 < /nginx-proxy/ngx_http_proxy_connect_module-master/patch/proxy_connect_rewrite_101504.patch12

编译,除正向代理模块外,其他看自己需求安装
PS:/usr/local/nginx默认安装目录
cd /nginx-proxy/nginx-1.20.1
./configure --prefix=/usr/local/nginx   \--with-http_ssl_module  --with-http_flv_module \--with-http_stub_status_module --with-http_gzip_static_module \--with-pcre  --add-module=/nginx-proxy/ngx_http_proxy_connect_module-mastermake && make install123456
3.4 正向代理补丁作者的说明(可跳过)
cd /nginx-proxy/ngx_http_proxy_connect_module-mastercat README.md12
比如nginx版本和对应正向代理的版本
Select patch
------------

* Select right patch for building:| nginx version | enable REWRITE phase | patch || --: | --: | --: || 1.4.x ~ 1.12.x   | NO  | [proxy_connect.patch](patch/proxy_connect.patch) || 1.4.x ~ 1.12.x   | YES | [proxy_connect_rewrite.patch](patch/proxy_connect_rewrite.patch) || 1.13.x ~ 1.14.x  | NO  | [proxy_connect_1014.patch](patch/proxy_connect_1014.patch) || 1.13.x ~ 1.14.x  | YES | [proxy_connect_rewrite_1014.patch](patch/proxy_connect_rewrite_1014.patch) || 1.15.2           | YES | [proxy_connect_rewrite_1015.patch](patch/proxy_connect_rewrite_1015.patch) || 1.15.4 ~ 1.16.x  | YES | [proxy_connect_rewrite_101504.patch](patch/proxy_connect_rewrite_101504.patch) || 1.17.x ~ 1.18.0  | YES | [proxy_connect_rewrite_1018.patch](patch/proxy_connect_rewrite_1018.patch) || 1.19.x ~ 1.21.0  | YES | [proxy_connect_rewrite_1018.patch](patch/proxy_connect_rewrite_1018.patch) || 1.21.1           | YES | [proxy_connect_rewrite_102101.patch](patch/proxy_connect_rewrite_102101.patch) || OpenResty version | enable REWRITE phase | patch || --: | --: | --: || 1.13.6 | NO  | [proxy_connect_1014.patch](patch/proxy_connect_1014.patch) || 1.13.6 | YES | [proxy_connect_rewrite_1014.patch](patch/proxy_connect_rewrite_1014.patch) || 1.15.8 | YES | [proxy_connect_rewrite_101504.patch](patch/proxy_connect_rewrite_101504.patch) || 1.17.8 | YES | [proxy_connect_rewrite_1018.patch](patch/proxy_connect_rewrite_1018.patch) || 1.19.3 | YES | [proxy_connect_rewrite_1018.patch](patch/proxy_connect_rewrite_1018.patch) || 1.21.1 | YES | [proxy_connect_rewrite_102101.patch](patch/proxy_connect_rewrite_102101.patch) |* `proxy_connect_<VERSION>.patch` disables nginx REWRITE phase for CONNECT request by default, which means `if`, `set`, `rewrite_by_lua` and other REWRITE phase directives cannot be used.
* `proxy_connect_rewrite_<VERSION>.patch` enables these REWRITE phase directives.12345678910111213141516171819202122232425262728
比如如何配置正向代理,见3.5
比如人如何验证,见四
3.5 nginx.conf 配置正向代理
cd /usr/local/nginx/conf/vim nginx.conf12
worker_processes  auto;events {
    worker_connections  1024;}http {
    include       mime.types;
    default_type  application/octet-stream;
    sendfile        on;
    keepalive_timeout  65;
    proxy_set_header HOST $host;
    proxy_buffers 256 4k;
    proxy_max_temp_file_size 0k;
    proxy_connect_timeout 30;
    proxy_send_timeout 60;
    proxy_read_timeout 60;
    proxy_next_upstream error timeout invalid_header http_502;############################################################# 配置正向代理,HTTP和HTTPS都支持
 server {
     listen                         8888;     #指定DNS服务器IP地址
     resolver                       8.8.8.8;     #设定代理服务器
     proxy_connect;     #允许的端口
     proxy_connect_allow            443;
     proxy_connect_connect_timeout  10s;
     proxy_connect_read_timeout     10s;
     proxy_connect_send_timeout     10s;     # 非CONNECT请求的转发代理
     location / {
         proxy_pass http://$host;
         proxy_set_header Host $host;     } } ############################################################ # 如果只想支持 http,可以这样设置
  server {
     listen                         6666;     #指定DNS服务器IP地址
     resolver                       8.8.8.8;     # 非CONNECT请求的转发代理
     location / {
         proxy_pass http://$host;
         proxy_set_header Host $host;     } }############################################################
   server {
        error_page   500 502 503 504  /50x.html;
        location = /50x.html {
            root   html;        }    }}12345678910111213141516171819202122232425262728293031323334353637383940414243444546474849505152535455
3.6 启动nginx
检查配置文件
/usr/local/nginx/sbin/nginx -t1
启动、停止、重载命令
/usr/local/nginx/sbin/nginx
/usr/local/nginx/sbin/nginx -s stop
/usr/local/nginx/sbin/nginx -s reload123
四、验证
4.1 202 上面配置正向代理
# 永久生效,只写一个也会生效echo  "export http_proxy=192.168.199.201:8888"  >>/etc/profileecho  "export https_proxy=192.168.199.201:8888" >>/etc/profilesource /etc/profile
OR# 临时curl --proxy 192.168.199.201:8888 http://www.baidu.com -Iv1234567
4.2 对比 202 和 203 分别访问 https 和http
4.2.1 https 结果如下
###########################################
202上,可以看出解析IP为代理机192.168.199.201,测试成功
curl -Iv https://cn.bing.com/?mkt=zh-cn1


###########################################
203上,解析IP为公网IP
curl -I -v https://cn.bing.com/?mkt=zh-cn1


4.2.2 http 如下
###########################################
202
curl --proxy 192.168.199.201:8888 http://www.baidu.com -Iv1

###########################################
203
curl http://www.baidu.com -Iv1


